The first part in a series of articles by quantity surveyor Keith Kelliher helping you cost the specific elements of your self-build.
At Self Build Live Dublin this past September in Citywest, I was approached by self-builders who had problems identifying their cost of building. Mostly at fault was the illogical yet widespread approach of averaging out costs. Average costs are not confined to self-builds; they are prevalent across the construction industry. Averages may be useful when discussing things in general but rarely does anyone actually hit that average figure.

FREE Tickets to Selfbuild, Extend & Renovate Limerick 2024
Selfbuild, Extend & Renovate Live is coming in Limerick. Showcasing over 85 local exhibitors, 2 theatres, 1-2-1 advice and much much more. Ideal for your home project.

This approach has resulted in many in the self-building community finding themselves with a dream design on a dream site with a full grant of planning permission only to find out the cost of building that dream is either above their reach or above the value they are willing to commit to the project.
In this series I will outline what can impact on cost, including material selection, shape and slope of the site as well as the specification. By providing an understanding of how projects are actually costed, I hope that future self-builders can approach the process of building and the estimation of costs with a far greater level of accuracy.
Throughout this review, the inaccuracy and dangers of estimating based on average costs will also be laid bare.
Substructure costs
In part one of this series I will outline the issues surrounding the costs of the substructure. This includes everything that’s below the finished floor level but excludes items like footpaths, paving or drainage which are dealt with later.

The main components that will affect the cost of your substructure are:
- type of soil which is very much site specific – different parts of your site will have different soil conditions; whether or not the ground is weight bearing enough will determine if you need the simplest, cheapest foundation or a more expensive option.
- level of the water table; if you hit water when you dig down you’re likely to have to reconsider where to build or invest in an expensive system to divert the water away from the building.
- proximity to rivers, lakes or wells as this can again impact on the water table but it may also mean you need to take account of the possibility of rising levels over the lifetime of the property in a more concerted way than a site that is not located near any water source.
- proximity to vegetation including trees, weeds, etc. These can provide guidance in respect to ground conditions and the need to address issues with root systems
- slope or site level; if you need to cut into a bank or the site needs to be levelled, you’re looking at added complexity and therefore more cost.
- the design, (shape and size), of the house has a direct cost impact on the foundations. The bigger the house the heavier it is and the more it requires support. A large ground floor area also means more walls which means more concrete.
Once all of these issues are known and understood, a foundation will be designed by a structural engineer for the property to meet the needs of the unique structure on the unique site. This specification can then be costed out including the level of groundworks required, getting concrete on site, how much of it, etc.
Foundation Types
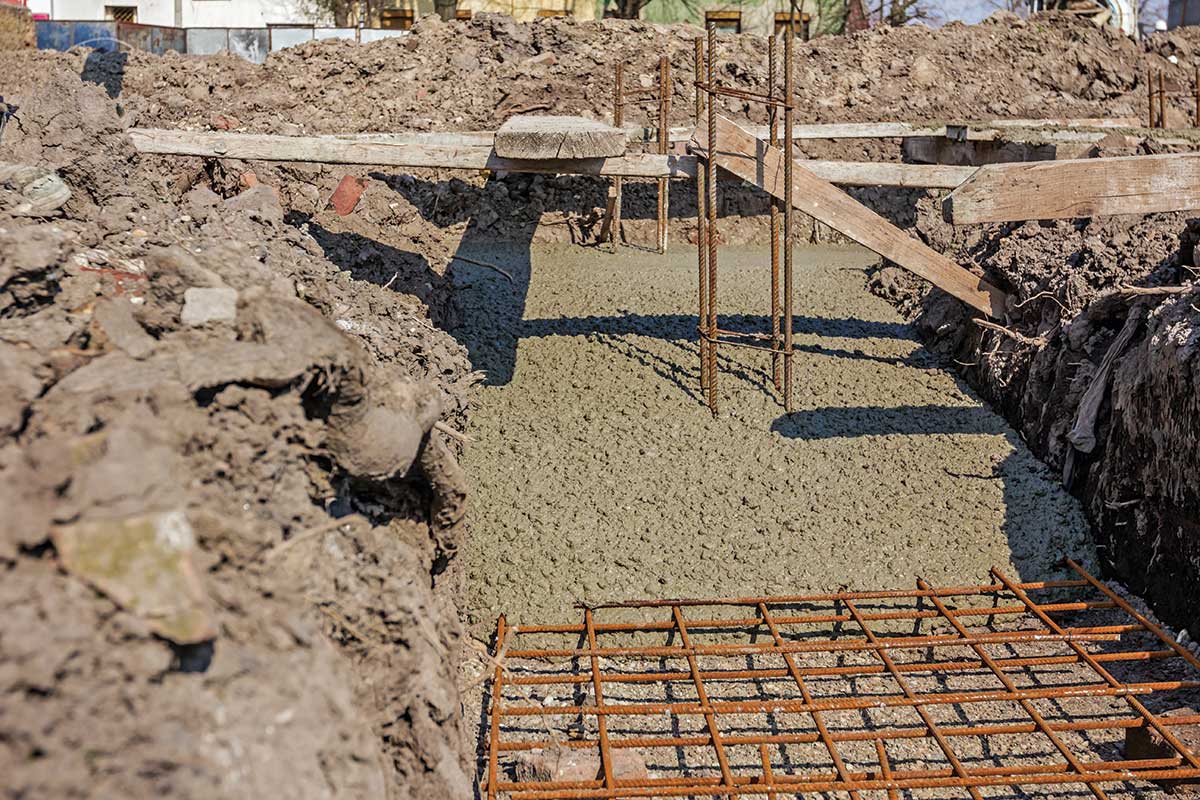
The most common type of foundation in NI and ROI is known as the strip foundation. A trench is excavated generally in the region of 900mm in width for an external wall but again this is not always the case. The width, depth and makeup of any specific foundation will need to be designed by an engineer. The depth is usually approximately 1m below ground level and the bottom of the trench is filled with concrete and reinforcement to a depth of approximately 300mm from which blockwork walls then commence upwards.
On average the first 700mm height of blockwork, generally known as the rising walls or dead-work, is located from the top of the foundation to the finished floor level. The blockwork is then used as a formwork for filling of stone to the underside of the new floor and for the pouring of concrete to the subsequent concrete floor slab.
Direct Costs
The same process applies for internal and external walls; however, the majority of internal walls will require a narrower foundation due to different wall thicknesses. Raft foundations are for areas where the ground conditions are not as firm as those where a strip foundation can be used. Raft foundations cover the entire area of the ground floor slab of a property and they spread the load of the building over a larger area than other foundations, thereby lowering the pressure on the ground.
In a raft foundation detail the entire structure is poured in one process. Raft foundations will generally require a substantial amount of additional formwork and steel reinforcement over and above a standard strip foundation making them more expensive. Where ground conditions are extremely poor piled foundations may be required. Piling involves a process of driving an individual column of concrete down into the ground until a firm level is reached.
A foundation is then constructed from pile cap to pile cap with the weight of the property spread across all of the piles and down to the firm ground below. Piling is an expensive addition to any project and the costs of the work can only be calculated after a detailed design has been completed. With the cost of mobilising piling equipment to and from site, its is generally the case that even the smallest of piling operations will add substantially to the cost of the substructure operation.
There is a danger in even attempting to cost piled foundations as they vary greatly depending on the number of piles required, the size of the pile and the kind of rig you will need. I had a job recently which was putting a basement in under a four bed semi and the piling just to hold back the neighbour’s house cost €100,000. Another job we had in south Dublin for a new house of circa 3,500 sqft had piling costs of €60,000.
Therefore soil investigations are definitely worth the effort before you spend time and energy in the house design.
Typical Example
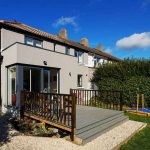
I generally find that the cheapest way to build is to copy the way our grandparents built their homes. This stands across all aspects, from shape to material selection to manner of construction. If we look at the shape and style of properties constructed in the 1940s, 1950s and 1960s in Ireland, most domestic properties were designed around simple rectangular shapes. Properties were generally constructed as a single level bungalow structure or standard two storey property.
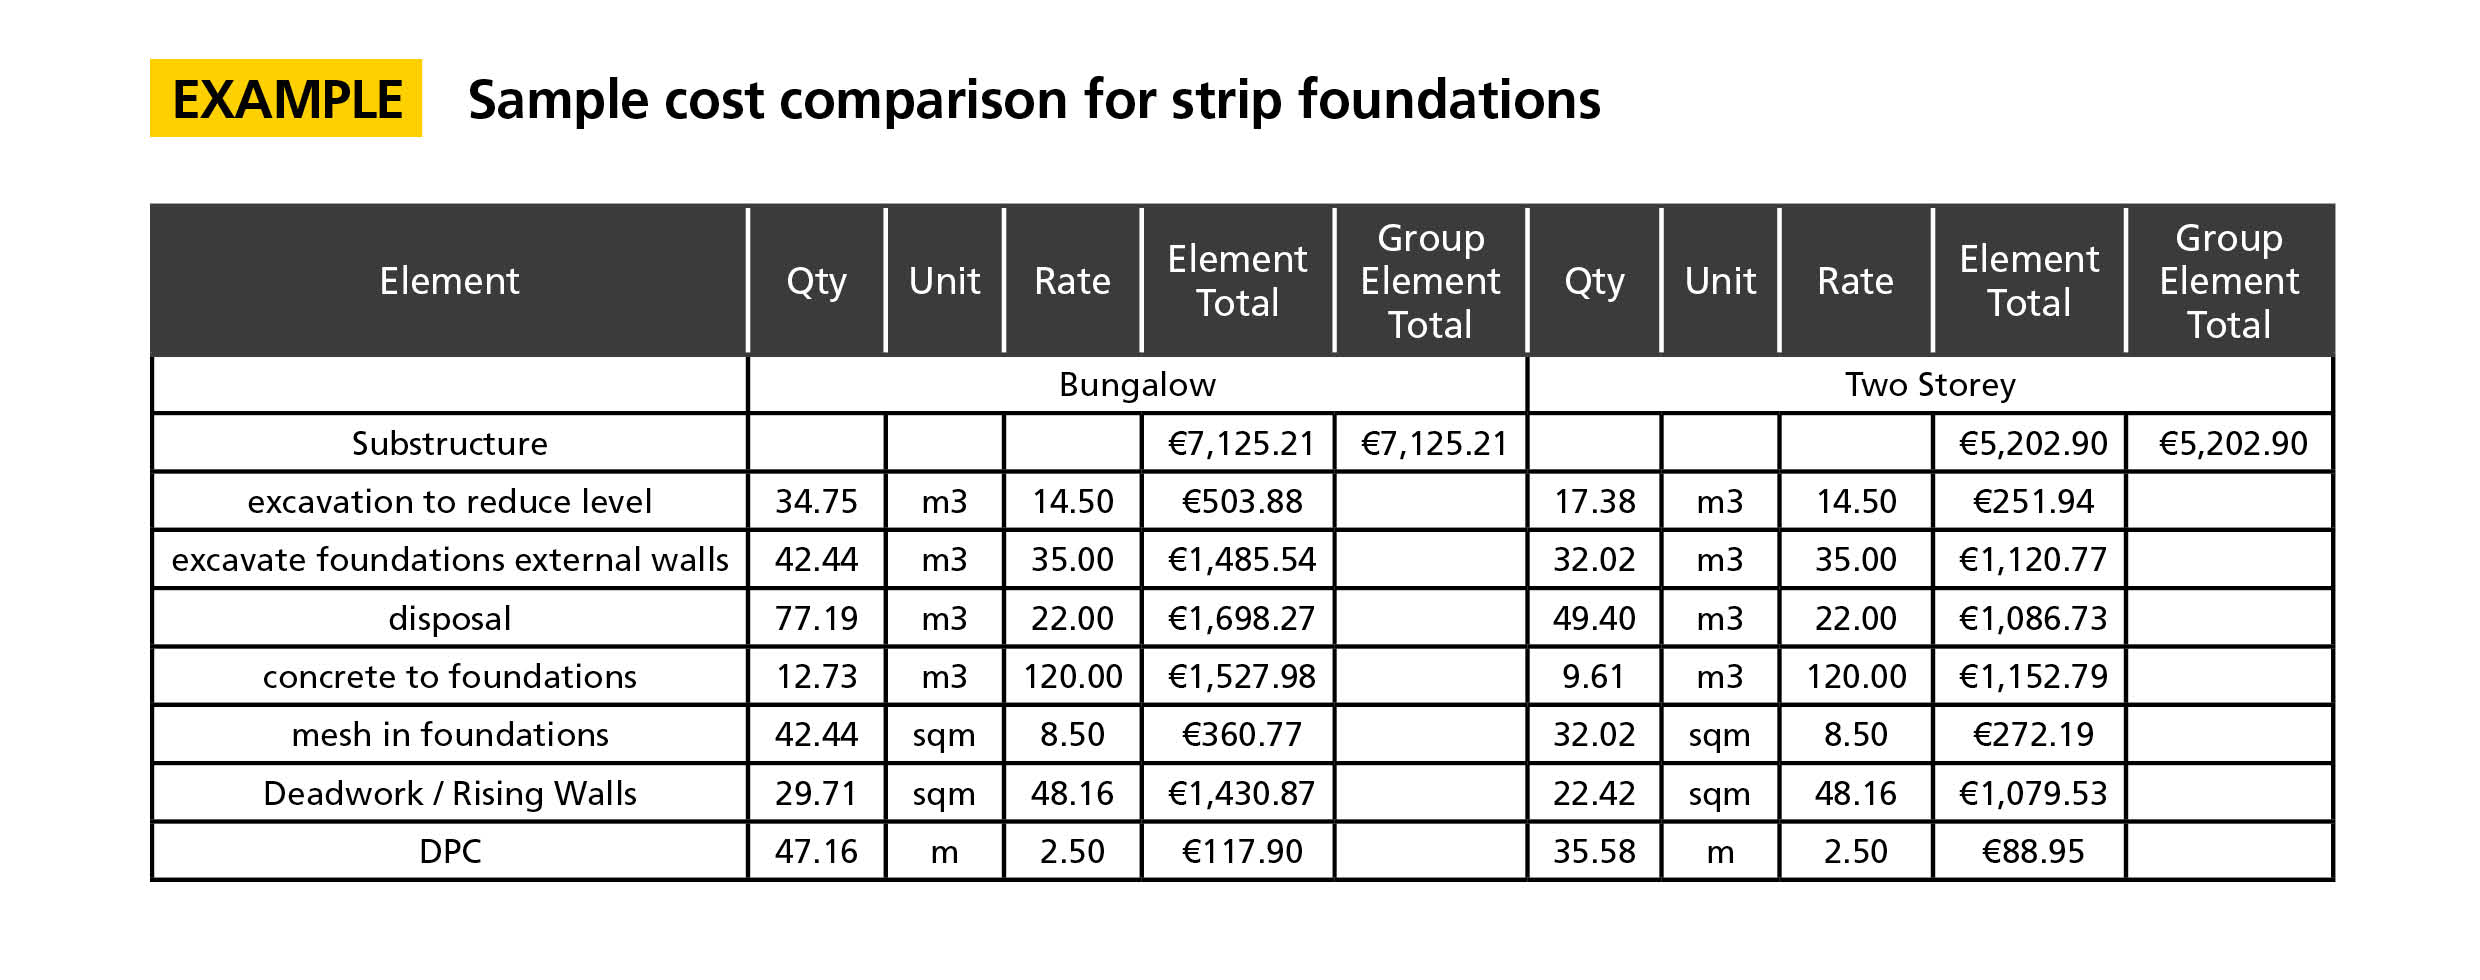
These building shapes were and continue to be the most economical shapes to construct. The less angles, turns, recesses or box outs that a design contains the cheaper the structure will be to build. It is obviously also the case that two properties measuring 139sqm (1,500sqft) in size where one property is a bungalow and the other is a two-storey property, will have differing costs of substructure with the two-storey property using a smaller footprint on the ground.
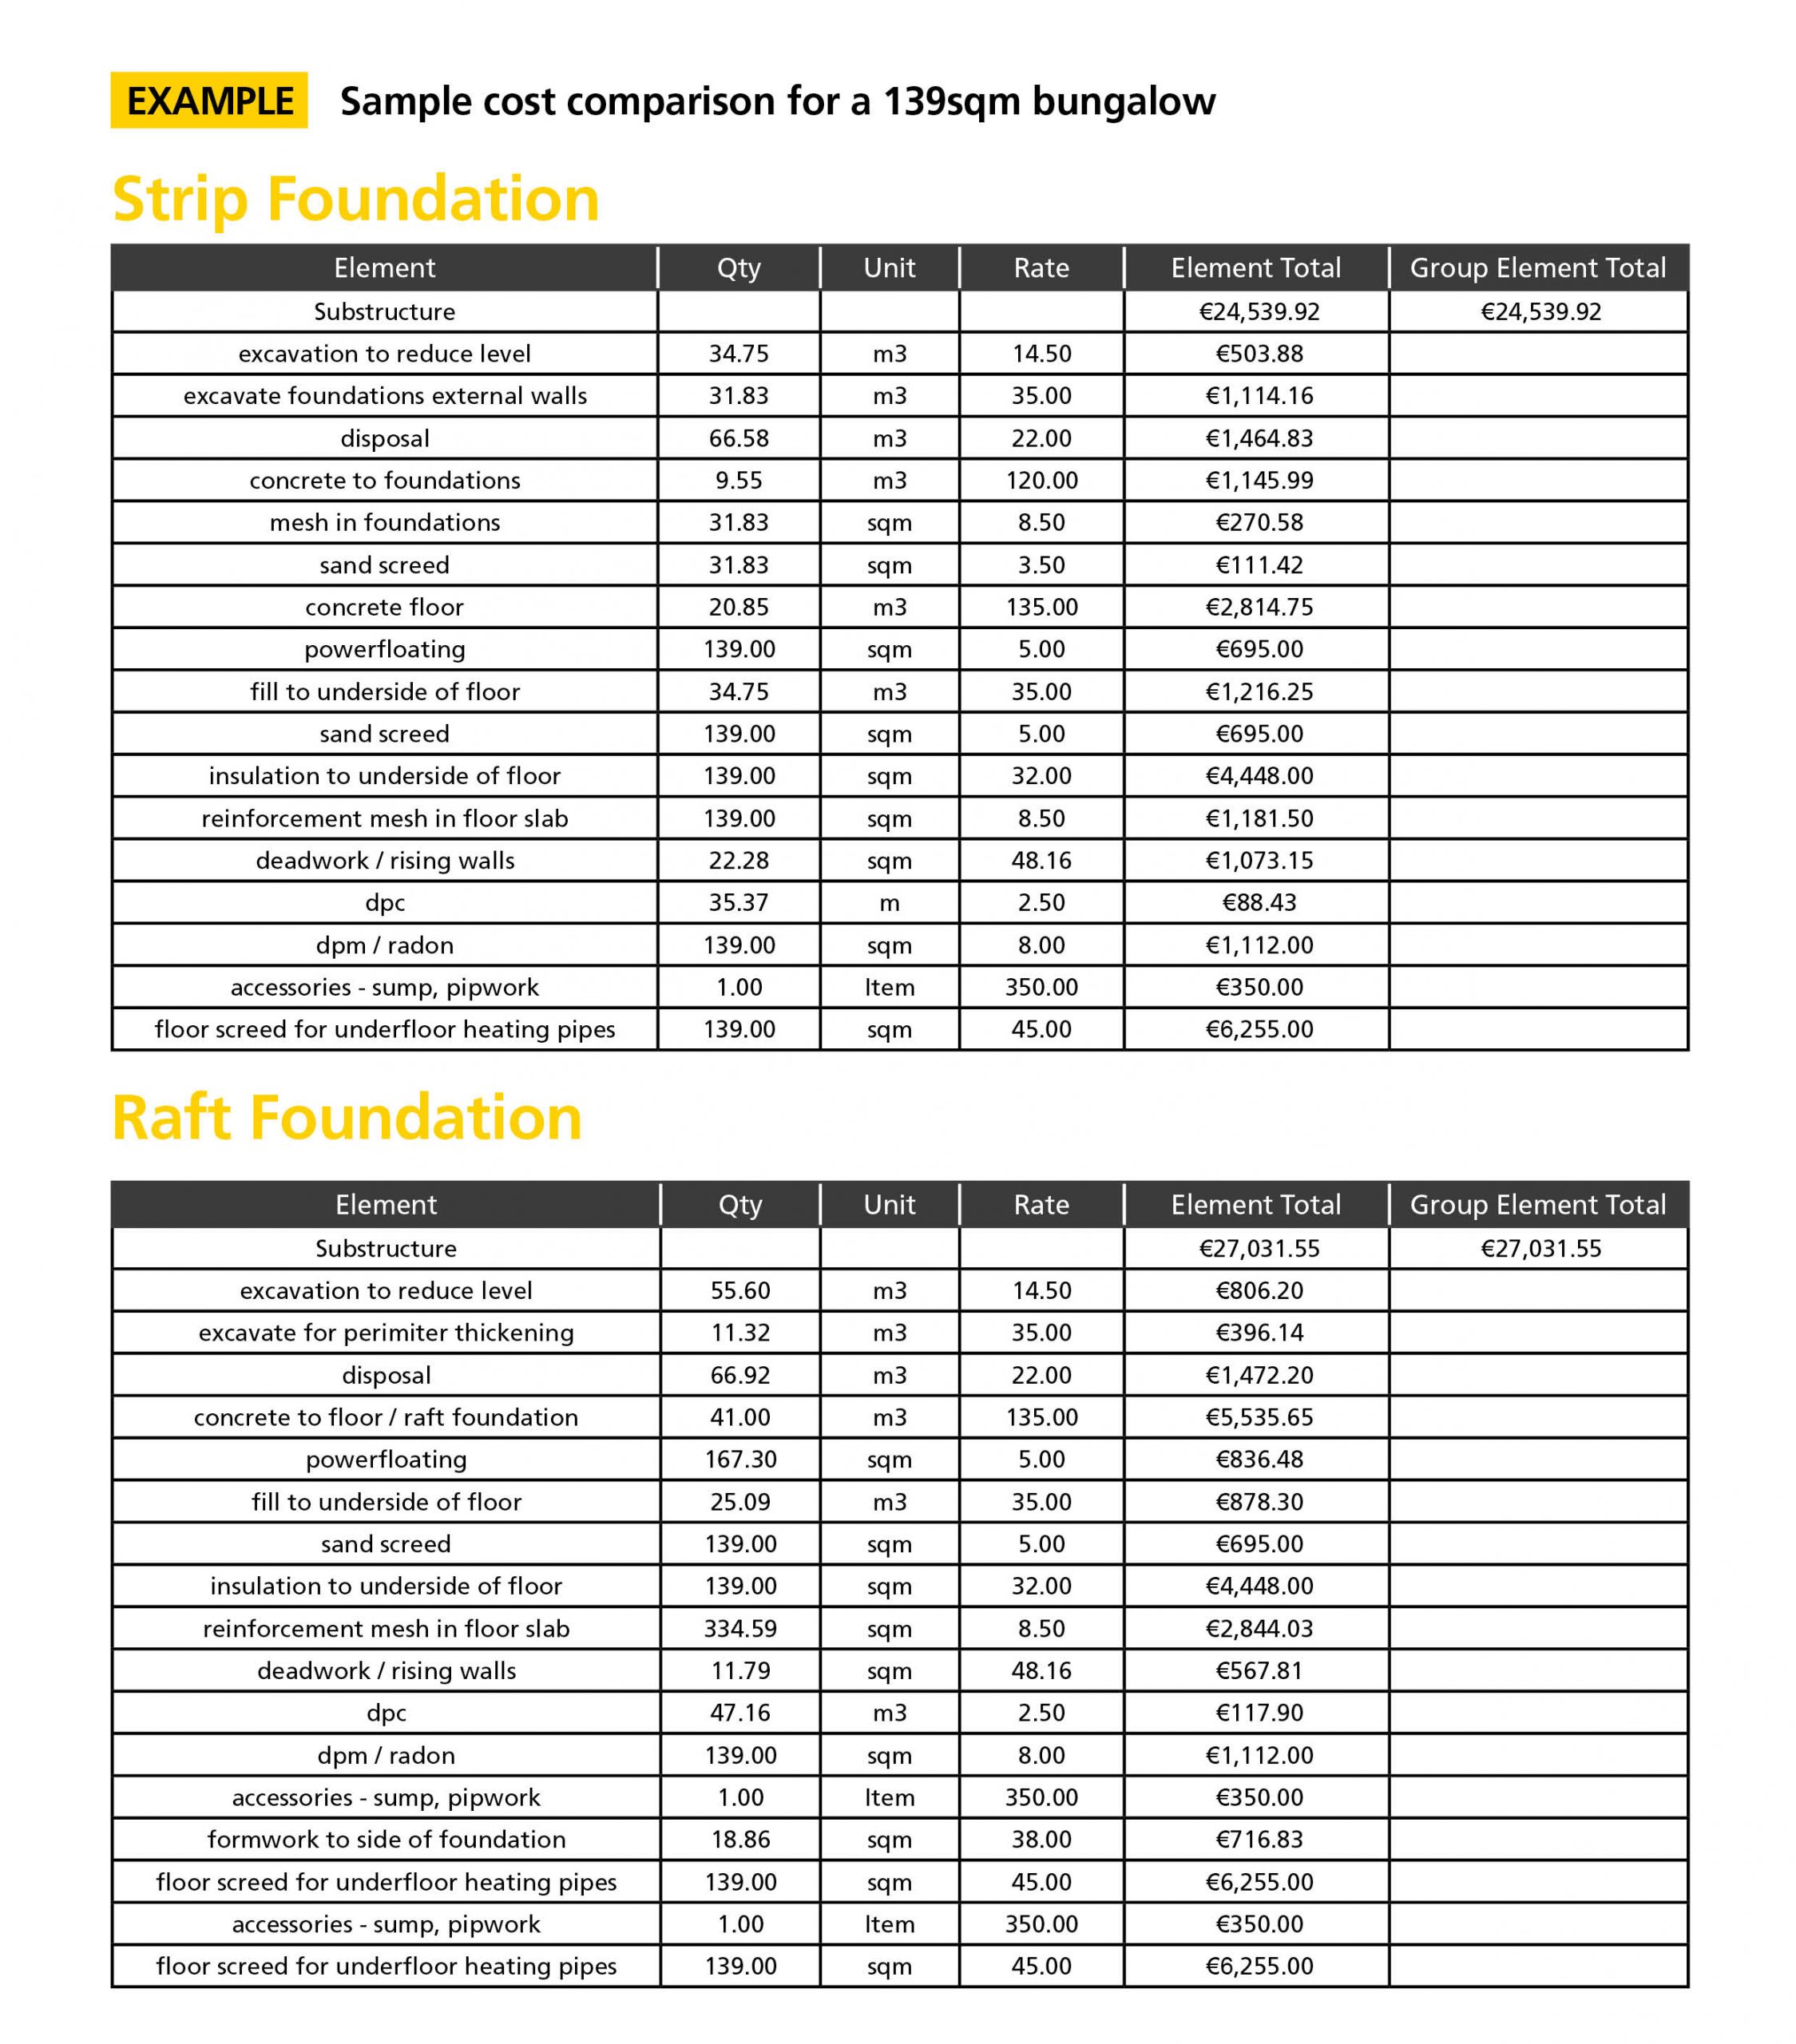
The example on the next page shows the comparison in foundation and rising wall costs of the external wall of two typical 139sqm properties, the two storey has a ground floor of roughly 70sqm. It should be noted that the rates included are for information purposes only – you can never rely on costs from other properties for your own, yours will need to be individually costed.
The figures also exclude VAT and relate to the labour, plant and material costs required to complete these works on a specific project. Again, every project is unique and it does not follow that the same rates apply to carry out the same work on different project sites. Location also tends to have a bearing on cost. In terms of pricing and costs, the initial works required on any site will involve the stripping of existing site vegetation, trees, and topsoil. The amount of each of these items will vary and, in some cases, a site may require little if any work.
The site now clear, it’s time to level the site and dig the trenches for your foundations. The entire footprint of the building has to be levelled to the point where the underside of the stone filling for the floor will be.
It is from this level that you will excavate the foundation trenches. Once the reinforcements and concrete have been poured, it’s time for the blockwork rising walls (known as dead-work due to their location below the ground). Blockwork in strip footing arrangements will generally, subject to an engineer’s design for the specific project, be in the region of 700mm high starting from the top of the foundation. Once the blockwork is completed, the underside of the floor level is filled with stone backfill materials and then compacted into place. It is important that the material chosen is certified in order to confirm the absence of any gas materials like pyrite in the stone. On top of the stone is a layer of levelled and compacted sand.
Then generally a 150mm concrete slab is installed across the floor to act as the main structural floor for the property. A damp proof membrane is laid across the floor and turned up to meet the top level of the blockwork where it will meet a damp proof course (DPC) in the blockwork.
The purpose of these materials is to deflect any dampness away from the property. To prevent heat loss through the blocks laid on the foundations, you can specify materials that prevent thermal bridging at an added cost. Floor insulation to the required thickness as specified by the designer is then laid onto the membrane with an upstand of insulation turned up to meet the external wall around the perimeter of the property. A second concrete floor, generally referred to as the screed, is then installed on the insulation and this provides the ground floor of the property.
In the case of underfloor heating, the pipes for that system will generally be laid on the insulation before the screed is poured. Oftentimes the insulation and screed aren’t installed until the roofing stage – this is to prevent damaging the floor. Blockwork to a raft foundation will generally only be 300-400mm in height above the foundation. Once the blockwork is in place and on the basis that the raft slab itself provides the main ground floor structure, the damp proof membrane is installed directly to the raft slab followed by the insulation and screed as outlined for the strip foundation above.
In all cases, drainage within the floor, radon sumps and pipework and any ducting or similar items can be designed and installed within the relevant structures.
The example on the page opposite for a 139sqm bungalow compares the cost of the standard strip foundation detail to the raft foundation detail. Specifications and day rates are the same on both properties. The difference between the two options is €2,491.63 excluding VAT. Even though this is a small difference – with the average costing model it’s only adding of €17.93 per sqm or €1.67 per sqft – always remember that it is merely for one element of a project and in most cases it is the sum of these types of differences that cause projects to run over budget.
Try our new ‘Selfbuild Cost Calculator’. Fill in details and instantly get a rough estimate for your project